1. Open your logo in Photoshop. Make sure the color mode is RGB color by choosing Mode > RGB Color from the Image menu.
2. Choose New > Layer From Background from the Layer menu.

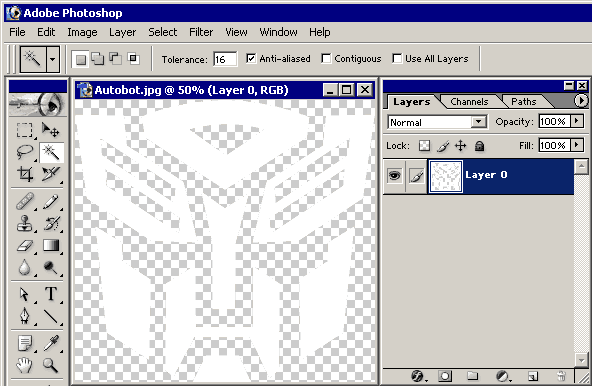
3. Use the Magic Wand or other selection tools to EITHER select the useful solid parts of your logo OR the surrounding white areas. You may need to adjust the 'Tolerance' settings to avoid getting a white or black fringe around your logo. Feel free to cancel the selection and try again until you get a good selection on your logo.

4a. IF you selected the parts of the logo you want to KEEP, Choose Inverse from the Select menu. Then choose Clear from the Edit menu. Then choose Deselect from the Select menu.
4b. IF you selected the white areas surrounding the logo you want to REMOVE, Choose Clear from the Edit menu. Then choose Deselect from the Select menu.

5. If you want your logo to be monochrome, choose Desaturate from the Image > Adjustments menu. You can then use the Invert and/or Brightness/Contrast commands under Image > Adjust to further tweak the brightness of the logo.
6. Resize the logo to fit within the crystal. The square logo area overlaps the irregular shape of the crystal, so you will want to use just the central part of the actual logo area for your design. Choose Image Size... from the Image menu. Using your own judgement, set the maximum width/height of the image to between 190 and 220 pixels.
7. Choose Canvas Size... from the Image menu and set the Width and Height of the image to 256.

8. Apply a Layer Style of Bevel and Emboss under the Layer menu. Here are some guideline settings:
Technique: Smooth
Depth: 150%
Size: 4px
Soften: 3px
Angle: -45°
Depth: 150%
Size: 4px
Soften: 3px
Angle: -45°

9. Set the Layer Opacity to 80%.

10. Choose Save for Web... from the File menu. Choose PNG-24 from the Settings drop-down menu and make sure Transparency is checked.
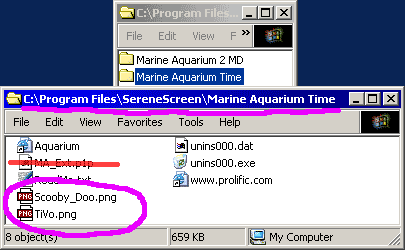
Put your new logo into the C:\Program Files\SereneScreen\Marine Aquarium 2.6\ or C:\Program Files\SereneScreen\Marine Aquarium Time\ folder
( wherever you have installed the Aquarium—not the Windows directory).

Put your new logo into the C:\Program Files\SereneScreen\Marine Aquarium 2.6\ or C:\Program Files\SereneScreen\Marine Aquarium Time\ folder
( wherever you have installed the Aquarium—not the Windows directory).
The finished product:
These logos MUST be installed in the same folder that you installed SereneScreen Marine Aquarium into. This is typically
C:\Program Files\SereneScreen\Marine Aquarium 2.6\
or
C:Program Files\SereneScreen Marine Aquarium Time\
Place the downloaded logos into your Marine Aquarium 2.6 or Marine Aquarium Time folder. If you see the files "Logo.dat" or "MA_Ext.p1p", delete them. They are any black-and-white BMP logo that may have been previously loaded.
You CANNOT use the the Import Logo button in the Aquarium Settings panel to install these logos.
The Import Logo button is for black-and-white BMP logos only.
If you have any other questions about how to create logos, would like to see your logo featured on my Marine Aquarium logo download site, or would like to submit a tutorial for another photo editing program like GIMP or PaintShop Pro, please contact me.